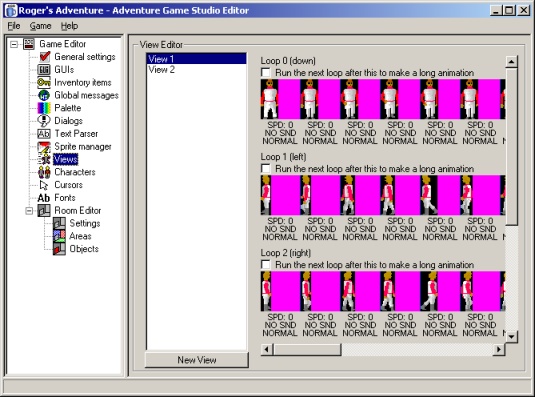
The View Editor showing view 1
A graphical adventure game would be no good without animations. These range from commonly-used animations such as the main character walking, to a flag waving in the background in one particular screen.
Animations in AGS are managed using Views. A view is a set of one or more loops. A loop is a set of frames which, when played in sequence, give the illusion of movement. Go to the "Views" mode in the main tree. This is the View Editor where you will put together all your animations.
The View Editor showing view 1
You should see View 1 selected in the list, and on the right you'll see lots of frames of Roger's walking animation. As I'm sure you've guessed, the "New view" button will create a new blank view.
Each loop is displayed as a row of images (one for each frame), going
from left to right. To change the image for a frame, double-click the
image, and you'll be presented with the sprite manager where you can
select the image to use. All images for use with views are imported as
usual via the sprite manager before they can be inserted into a frame.
At the right hand end of a loop, you'll see the text "New
frame", which you can click to create a new extra frame at the end of
the loop. You can also right-click a frame to insert a new one before or
after it.
You'll notice each frame has three pieces of text underneath the image:
How you use these views to actually run an animation in game will be explained later on.
If you remember back to part 3 of this tutorial, we talked about three types of thing that the player can interact with - hotspots, objects and characters. We've now covered the former two, so now it's time to take a look at characters.
Put simply, a character is similar to an object, except that it can move between different rooms in the game, take part in conversations, carry its own inventory, be scaled up and down, lit according to light levels in the room, and more.
Go to the "Characters" mode in the main tree. You'll see that so far you only have one character in the list, labelled "0: ROGER". You can create a new character by clicking the "New Character" button under the list.

The Character Editor
There are quite a few options available for each character. Rather than explain them all here, we'll just cover the most important ones - you can find a full description of all the options in the manual.
The character's "Name" field simply gives you an easy way to identify the character in the editor, and can also be accessed from the game script if desired.
The "Script name" field is very important, as it sets the name by which the character will be referred to in dialog scripting and text scripting. The reason for having this seperate name is that the script name can only contain the letters A-Z, whereas the main Name field can contain any characters.
Just in case you missed it, I'll repeat what was just said in the Characters section - the "Starts in room" setting of the player character is used to determine which room the game starts off in.
|
|
TIP: This feature can be handy for testing various parts of your game. For example, when you're working on room 16, set the starting room to room 16 so that you can get to it instantly when you run the game to test it. |
You can easily add intro, outro and cutscene sequences to your game. There is no specific feature to do this - you simply use the provided animation and movement commands to do whatever you like.
|
|
A cutscene is simply the name given to a sequence of actions over which the player has no control. This usually applies to the entire introduction sequence, as well as far simpler in-game events. For example, if the player goes to pick up a rock from the ground, you may wish to use a bending-down animation to show him picking it up. During this bending down and standing back up, the player cannot control proceedings, so it is a cutscene. |
There are two main ways of creating cutscenes - the Interaction Editor, and the text script.
To start with, you'll probably be more comfortable using the Interaction Editor, as it provides a point-and-click way of setting up the commands. As you progress with AGS, or if you have some programming experience, you may prefer to jump straight to the text script.
Right, firstly let's do something very simple. When the player goes to pick up the key from the floor of our room, we want him to walk over to it first rather than it just disappearing from wherever he's standing.
So, we want to add something extra to picking up the key. How do we do this? Yes, that's right, we need the Interaction Editor for Object 0 in Room 1 (which is the key). If it's not already loaded, fire it up and return to the interactions we created earlier:
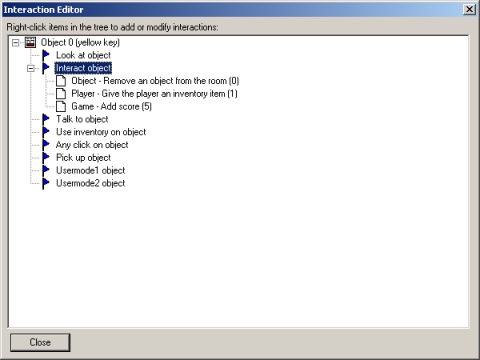
Remember this?
Now, we want the player to walk across to the key before it disappears, so right-click on "Object - Remove an object" and select "Add action before this". We're greeted by the Action Editor once again.
Select "Character - Move Character" from the drop-down list. Change the Character setting to "Roger" (it will then be displayed as "EGO", the script name).
Eeek! It wants a destination X and Y location! We don't know that yet, so press OK to close the action editor, and then Close the interaction editor too.
Move the mouse cursor to where the key is on the background. Look just above the background image, and you should see "Mouse pos: 205, 128" or something similar. These are the X and Y co-ordinates, respectively, of the key's location. So, note them down, and return to the Interaction Editor.
Double-click the "Character - Move Character" entry to open it up for editing, and click Change on the Destination X and Y locations to set them to the numbers we just discovered. We also want to set the "Wait for move to finish" option to True - otherwise, the command will just start Roger off on his way, and then immediately proceed to pick the key up before he gets there!
OK out of the action editor and you should see something similar to this:
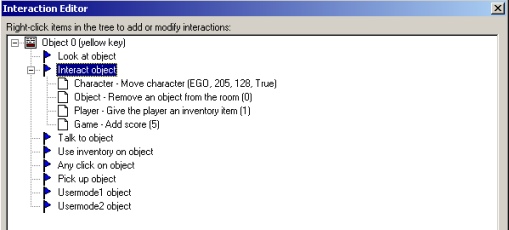
Our new command is top of the list for execution
Save the room and game, and try it out!
OK, I think we've had enough of animations and cutscenes for now. We'll return later to explore actual animations and more complex cutscenes. If you want to try some out, check out the "Character - Quick animation" command to get you going.
Go to part 8: Conversations
Tutorial last updated 19 January 2003. Copyright (c) 2003 Chris Jones.